Hello from Castrum Lusitania, my fortress in northern Portugal. Welcome to another edition of our weekly newsletter.
As I wrote last week, I made a substantial change to my process by introducing digital pencils to my work process. So it seems only natural to share a basic step-by-step of how I do it. But first things first:
Why I Changed to Digital Pencils
The main reason is very simple: time. Even though I always drew all my pages traditionally, I had enough experience to know that drawing digitally is faster. In some cases, way faster.
However, I never enjoyed drawing digitally as much as I enjoy on paper, so I kept digital for things like designs or thumbnails, but not for the main part of the job: drawing pages. That means that I kept my process the same for a while. But the better I got with the iPad and Clip Studio, the more obvious it was to me the potential speed gains.
So I decided to give it a go and pencil a couple of covers digitally: the Deluxe edition of Righteous Thirst For Vengeance and the cover for Phenomena Book 2. I’ve showed both previously here. Then I printed them and inked them traditionally.
It went so well that I immediately decided to do Phenomena Book 3 like that. So from now on, it’s very likely that all my pencils are going to be digital, but I’ll keep inking traditionally. I like it too much not to and I don’t want to spend all my time staring at a screen if I can avoid it.
Step-By-Step
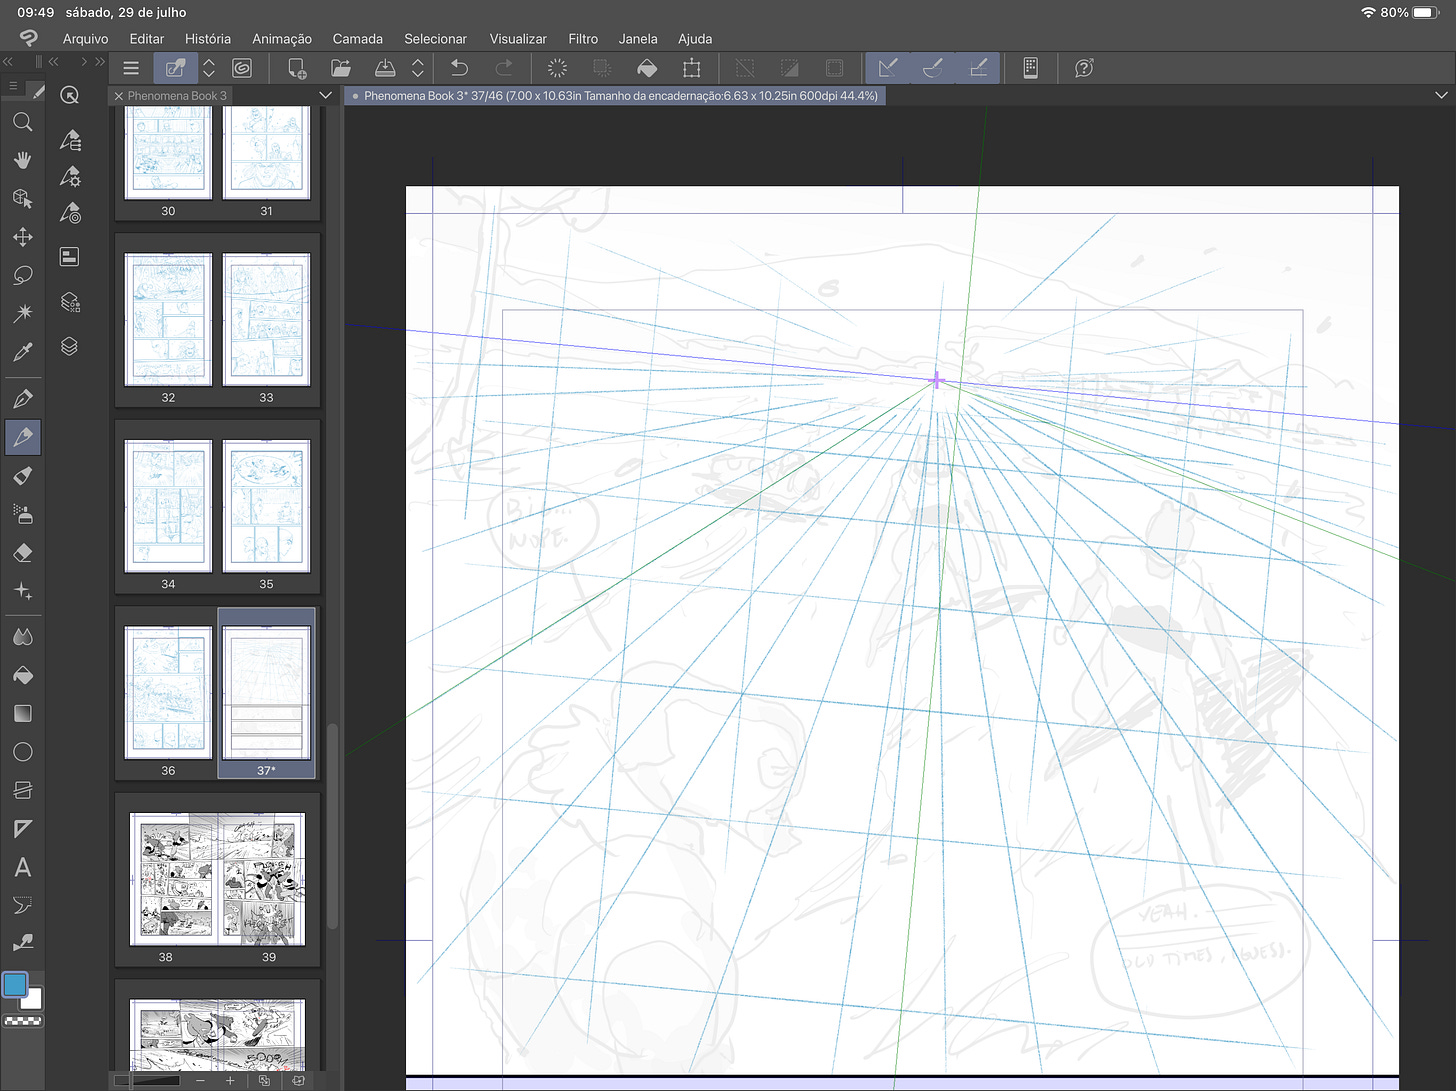
I’m currently penciling at roughly the double of speed, having done 38 pages (pencils only) in around two weeks. Much of it it’s due to the fact that 1) digitally I’m able to draw on top of my thumbnails and 2) how quick it is to establish a perspective grid and use it with the snap-to feature. Let’s see both things in this basic set-by-step.
I chose a simple panel, albeit with all these steps, to make it all as clear as possible. So with all the thumbnails done, I save the file with a different name and begin working on my pencils. Since I’m continuing the work, rather than starting with a blank board, when I begin penciling I have the finished thumbnail to start with:
First thing I do is drop the opacity of the layer to around 6 or 7 percent. Because I’ll be drawing on top with a pencil-like tool and in light blue, I want it nearly invisible to not interfere to much.
Next, if needed be, I draw a perspective grid. This panel is mostly an open field, but having a grid helps to establish depth, since with it in place I have a precise notion where each object should touch the floor. The relationship between every contact point with the floor is what establishes the distances between objects, which is what creates the illusion of depth. Little lines like grass and small rocks in the ground help further the effect, but mostly is where feet touch the floor that makes it or break it.
Then comes the actual drawing, meaning the actual lines I’ll have to ink. Everything prior to this is construction stuff that won’t be seen or inked. I lower the opacity of the grid layer to 50%, again for the reasons stated above, and start fresh on a new layer. Because my thumbnails are pretty solid, they serve as a first pass and all I have to do is draw over them with some slight corrections - hence why in some cases you see no hesitance or corrections, only a clean line (like Spike). On this specific case I’m also using the perspective grid as reference for the final pencils. It helps correcting posture, scale, spatial relationships and where the feet touch the ground. It’s all minor adjustments, if you compare the final pencils to the thumbnail, but it’s the bit that makes the difference.
Finally, when I’m happy with the pencils, I erase all the layers I have no use for anymore. In some cases I leave the grid to guide my inking as well if I leave too much to draw in ink. In this case, it’s likely I won’t need it.
This is pretty much it. In the future we’ll certainly go over more complex scenes, pages or panels, but the bottom line is that my digital pencils are pretty much done in the same way I do traditional pencils. No 3D models or any other thing I wasn’t doing before, as I don’t feel the need to transform the way my drawings look. The nature of digital is what makes everything faster. And cleaner in the end, because I can turn off/erase everything I don’t need.
Next step is print this and ink it traditionally, which I should get started next week. My current batch of pages is 46 and I can see the end of it from here. Though 3 covers on my schedule might disagree with that.
We’ll find out soon enough. See you next week!
André


Always appreciate you sharing your process man. Your speed just amazes me, especially since the work is so stellar! Switching to digital pencils, do you ever find yourself zooming in too much? Or have you lost some of the tactile pleasure of drawing on paper?
That’s fascinating! I need to experiment with some of my local print shops. Do you bring your own paper or do they keep the paper you need?